MAC NVM管理多版本Node
HomeBrew安装和管理多版本Node问题
brew无法安装老版本node了
# 目前已经不支持node@12版本安装
通过homebrew已经安装好的node@12切换后无法正常使用
# 之前安装好的node@12 通过脚本切换到node@12 无法正常运行node命令
新的解决方案:通过NVM来实现多版本node安装和切换
# nvm:node version manager 可以方便的管理多版本node
HomeBrew安装和配置NVM
卸载通过homebrew安装的所有node版本
# 查看已安装的node版本
brew list |grep node
# 忽略依赖node的其他应用
brew uninstall --ignore-dependencies node
# 卸载node
brew uninstall --force node
# 卸载node@12
brew uninstall --force node@12
# 卸载node@18
brew uninstall --force node@18
安装nvm
# 执行brew update
brew update
# 查看nvm信息和版本
brew info nvm
# 安装nvm
brew install nvm
配置nvm
# 配置nvm工作目录,nvm安装的node版存放的目录
mkdir ~/.nvm
# 配置nvm的运行环境: 打开Terminal配置文件“~/.zshrc”,添加下面配置,并保存
export NVM_DIR="$HOME/.nvm"
[ -s "/opt/homebrew/opt/nvm/nvm.sh" ] && \. "/opt/homebrew/opt/nvm/nvm.sh"
[ -s "/opt/homebrew/opt/nvm/etc/bash_completion.d/nvm" ] && \. "/opt/homebrew/opt/nvm/etc/bash_completion.d/nvm"
验证nvm
# 新开一个Terminal 执行:
nvm -help
# 如果能正常输出 则安装成功
安装node
安装node
# 检查nvm上可安装的所有node版本列表
nvm ls-remote
# 安装最新node版本 作为默认版本(第一个安装的版本作为默认版本)
nvm install node
# 检查安装结果
node -v && npm -v
# 继续安装 node@18
nvm install 18
# 检查安装结果
node -v && npm -v
# 继续安装 node@12
nvm install 12
# 检查安装结果
node -v && npm -v
临时切换版本
# 切换node@18
nvm use 18
node -v && npm -v
# 切换node@12
nvm use 12
node -v && npm -v
# 切换会默认
nvm use default
node -v && npm -v
切换默认版本
# 新开Terminal时,node为默认版本
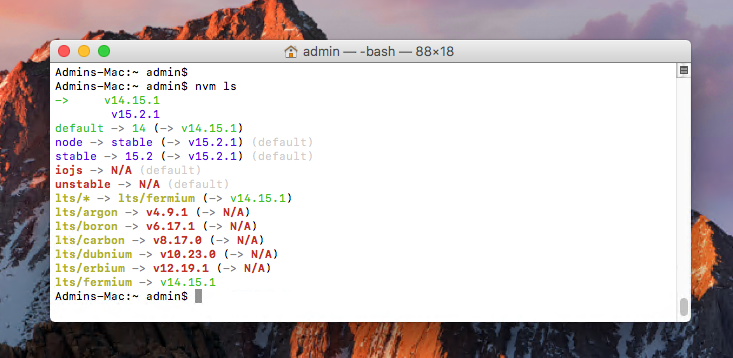
# 查看默认版本和所有已安装版本:
nvm ls
# 如果要切换默认版本 可以用("12.xx.xx"从上面nvm ls命令行得到):
nvm alias default 12.xx.xx
How To Install NVM on macOS with Homebrew
By RahulAugust 10, 20233 Mins Read
Node Version Manager (NVM) is a widely-used tool that allows developers to manage multiple versions of Node.js on a single machine. Its importance cannot be overstated, as Node.js applications can sometimes be version-specific, and different projects may require different Node.js versions. The flexibility offered by NVM ensures a smooth development process, allowing developers to switch between Node versions seamlessly. On macOS, there are multiple methods to install NVM, but one of the most popular and efficient ways is using Homebrew, the renowned package manager for macOS.
This guide will walk you through the detailed steps of installing NVM on macOS using Homebrew, allowing you to set up a flexible Node.js development environment with ease.
Prerequisites
-
You must have macOS desktop access with administrator privileges.
-
If you don’t have Homebrew installed on your macOS, you can install it by pasting the following command in the terminal:
/bin/bash -c "$(curl -fsSL https://raw.githubusercontent.com/Homebrew/install/HEAD/install.sh)"For more instruction visit Homebrew installation tutorial.
Step 1: Remove Existing Node Versions
If your system already has a node installed, uninstall it first. My system already has installed node via Homebrew. So uninstalling it first. Skip if not already installed.
brew uninstall --ignore-dependencies node
Step 2: Install NVM on macOS
-
Before installing any packages, it’s always a good idea to update Homebrew to the latest version and update the formulae.
brew update -
After that, you can easily install NVM using the following command:
brew install nvm -
Next, create a .nvm directory in the home.
mkdir ~/.nvm -
Now, configure the required environment variables. Edit the following configuration file in your home directory
vim ~/.bash_profile -
Add the below lines to ~/.bash_profile ( or ~/.zshrc for macOS Catalina or newer versions)
export NVM_DIR="$HOME/.nvm"
[ -s "/usr/local/opt/nvm/nvm.sh" ] && \. "/usr/local/opt/nvm/nvm.sh"
[ -s "/usr/local/opt/nvm/etc/bash_completion" ] && \. "/usr/local/opt/nvm/etc/bash_completion"
~/.bash_profile
Bash
Copy
Press ESC + :wq to save and close your file.
-
Next, load the variable to the current shell environment. From the next login, it will automatically loaded.
source ~/.bash_profile
That’s it. The NVM has been installed on your macOS system. Go to next step to install Node.js versions with the help of nvm.
Step 3: Using NVM
First of all, see what Node versions are available to install. To see available versions, type:
nvm ls-remote
Now, you can install any version listed in above output. You can also use aliases names like node for latest version, lts for latest LTS version, etc.
nvm install node
After installing you can verify what is installed with:
nvm ls
If you have installed multiple versions on your system, you can set any version as the default version any time. To set the node 18.X as default version, simply use:
nvm use 18
Similarly, you can install other versions like Node 12, 15, and 18 versions and switch between them.
Conclusion
Having the capability to manage and switch between various Node.js versions is essential for modern web development, and NVM provides that flexibility. By leveraging Homebrew on macOS, the installation process becomes streamlined, making it easier than ever to get NVM up and running. Once installed, developers can enjoy a hassle-free experience, working on multiple Node.js projects regardless of their version requirements.
This guide has furnished you with all the knowledge needed to install NVM on macOS using Homebrew. Now, you’re ready to tackle any Node.js project, knowing you have the power to easily manage and switch between Node versions at your fingertips.