快速部署和更新证书
通过FreeSSL快速申请或更新证书
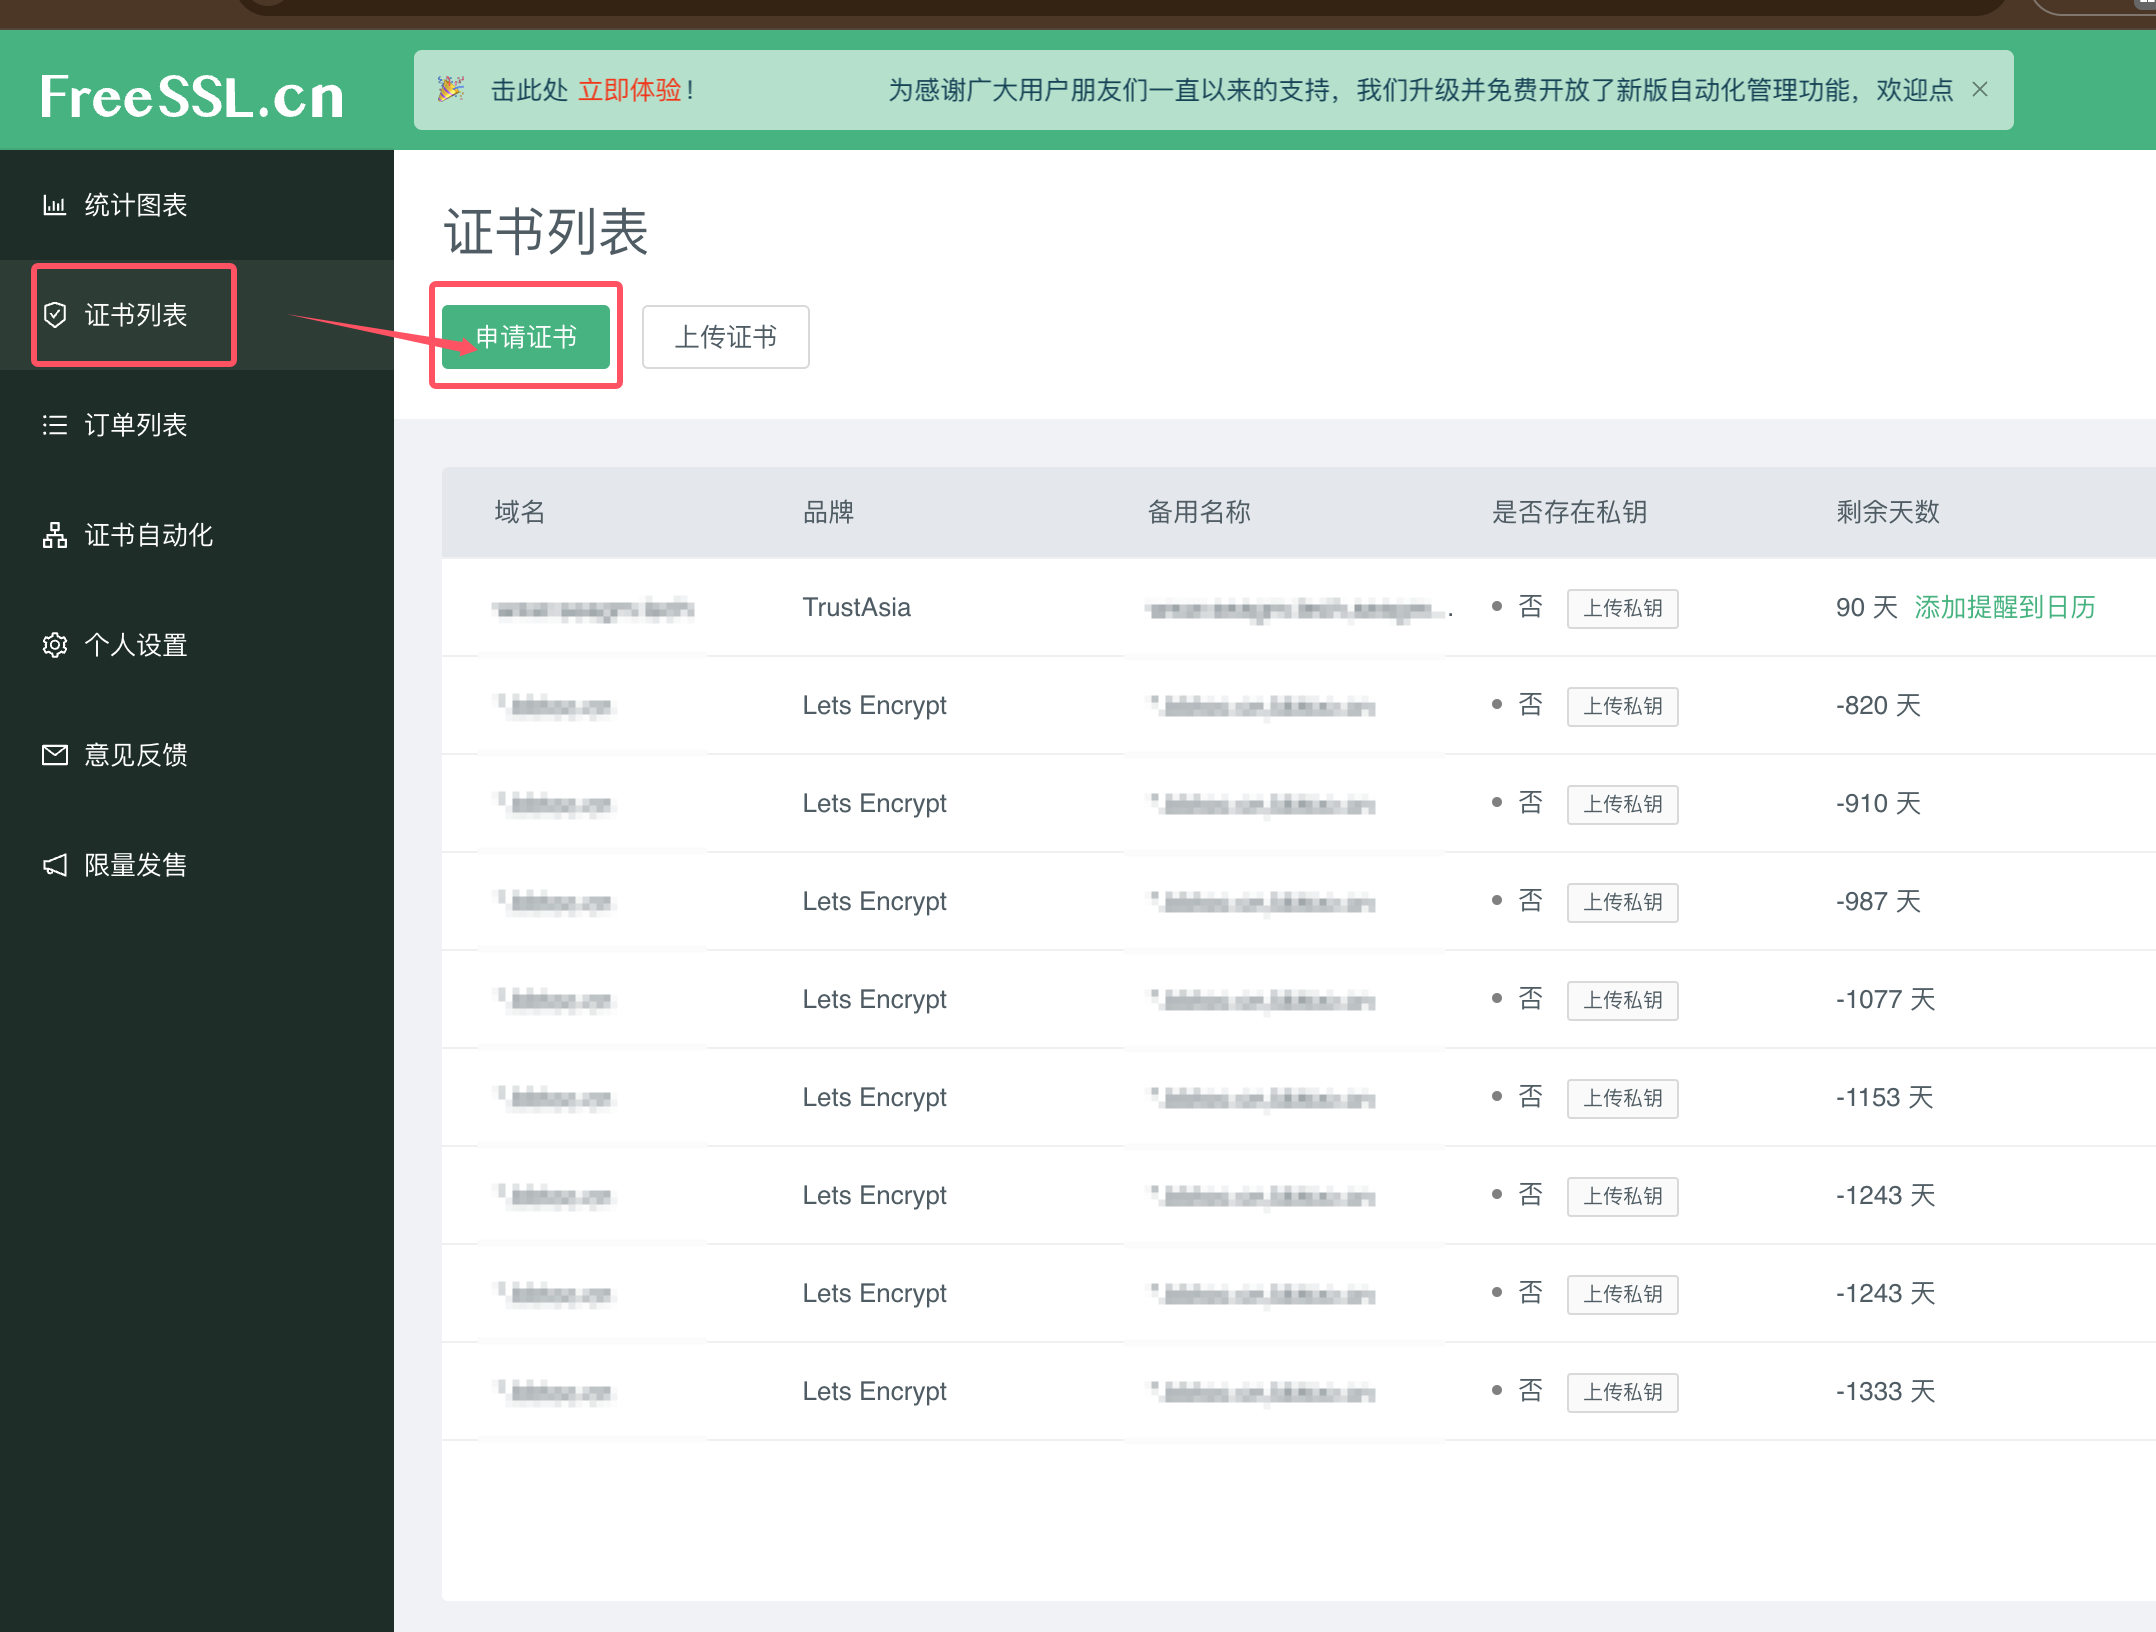
1 登录证书签发网站
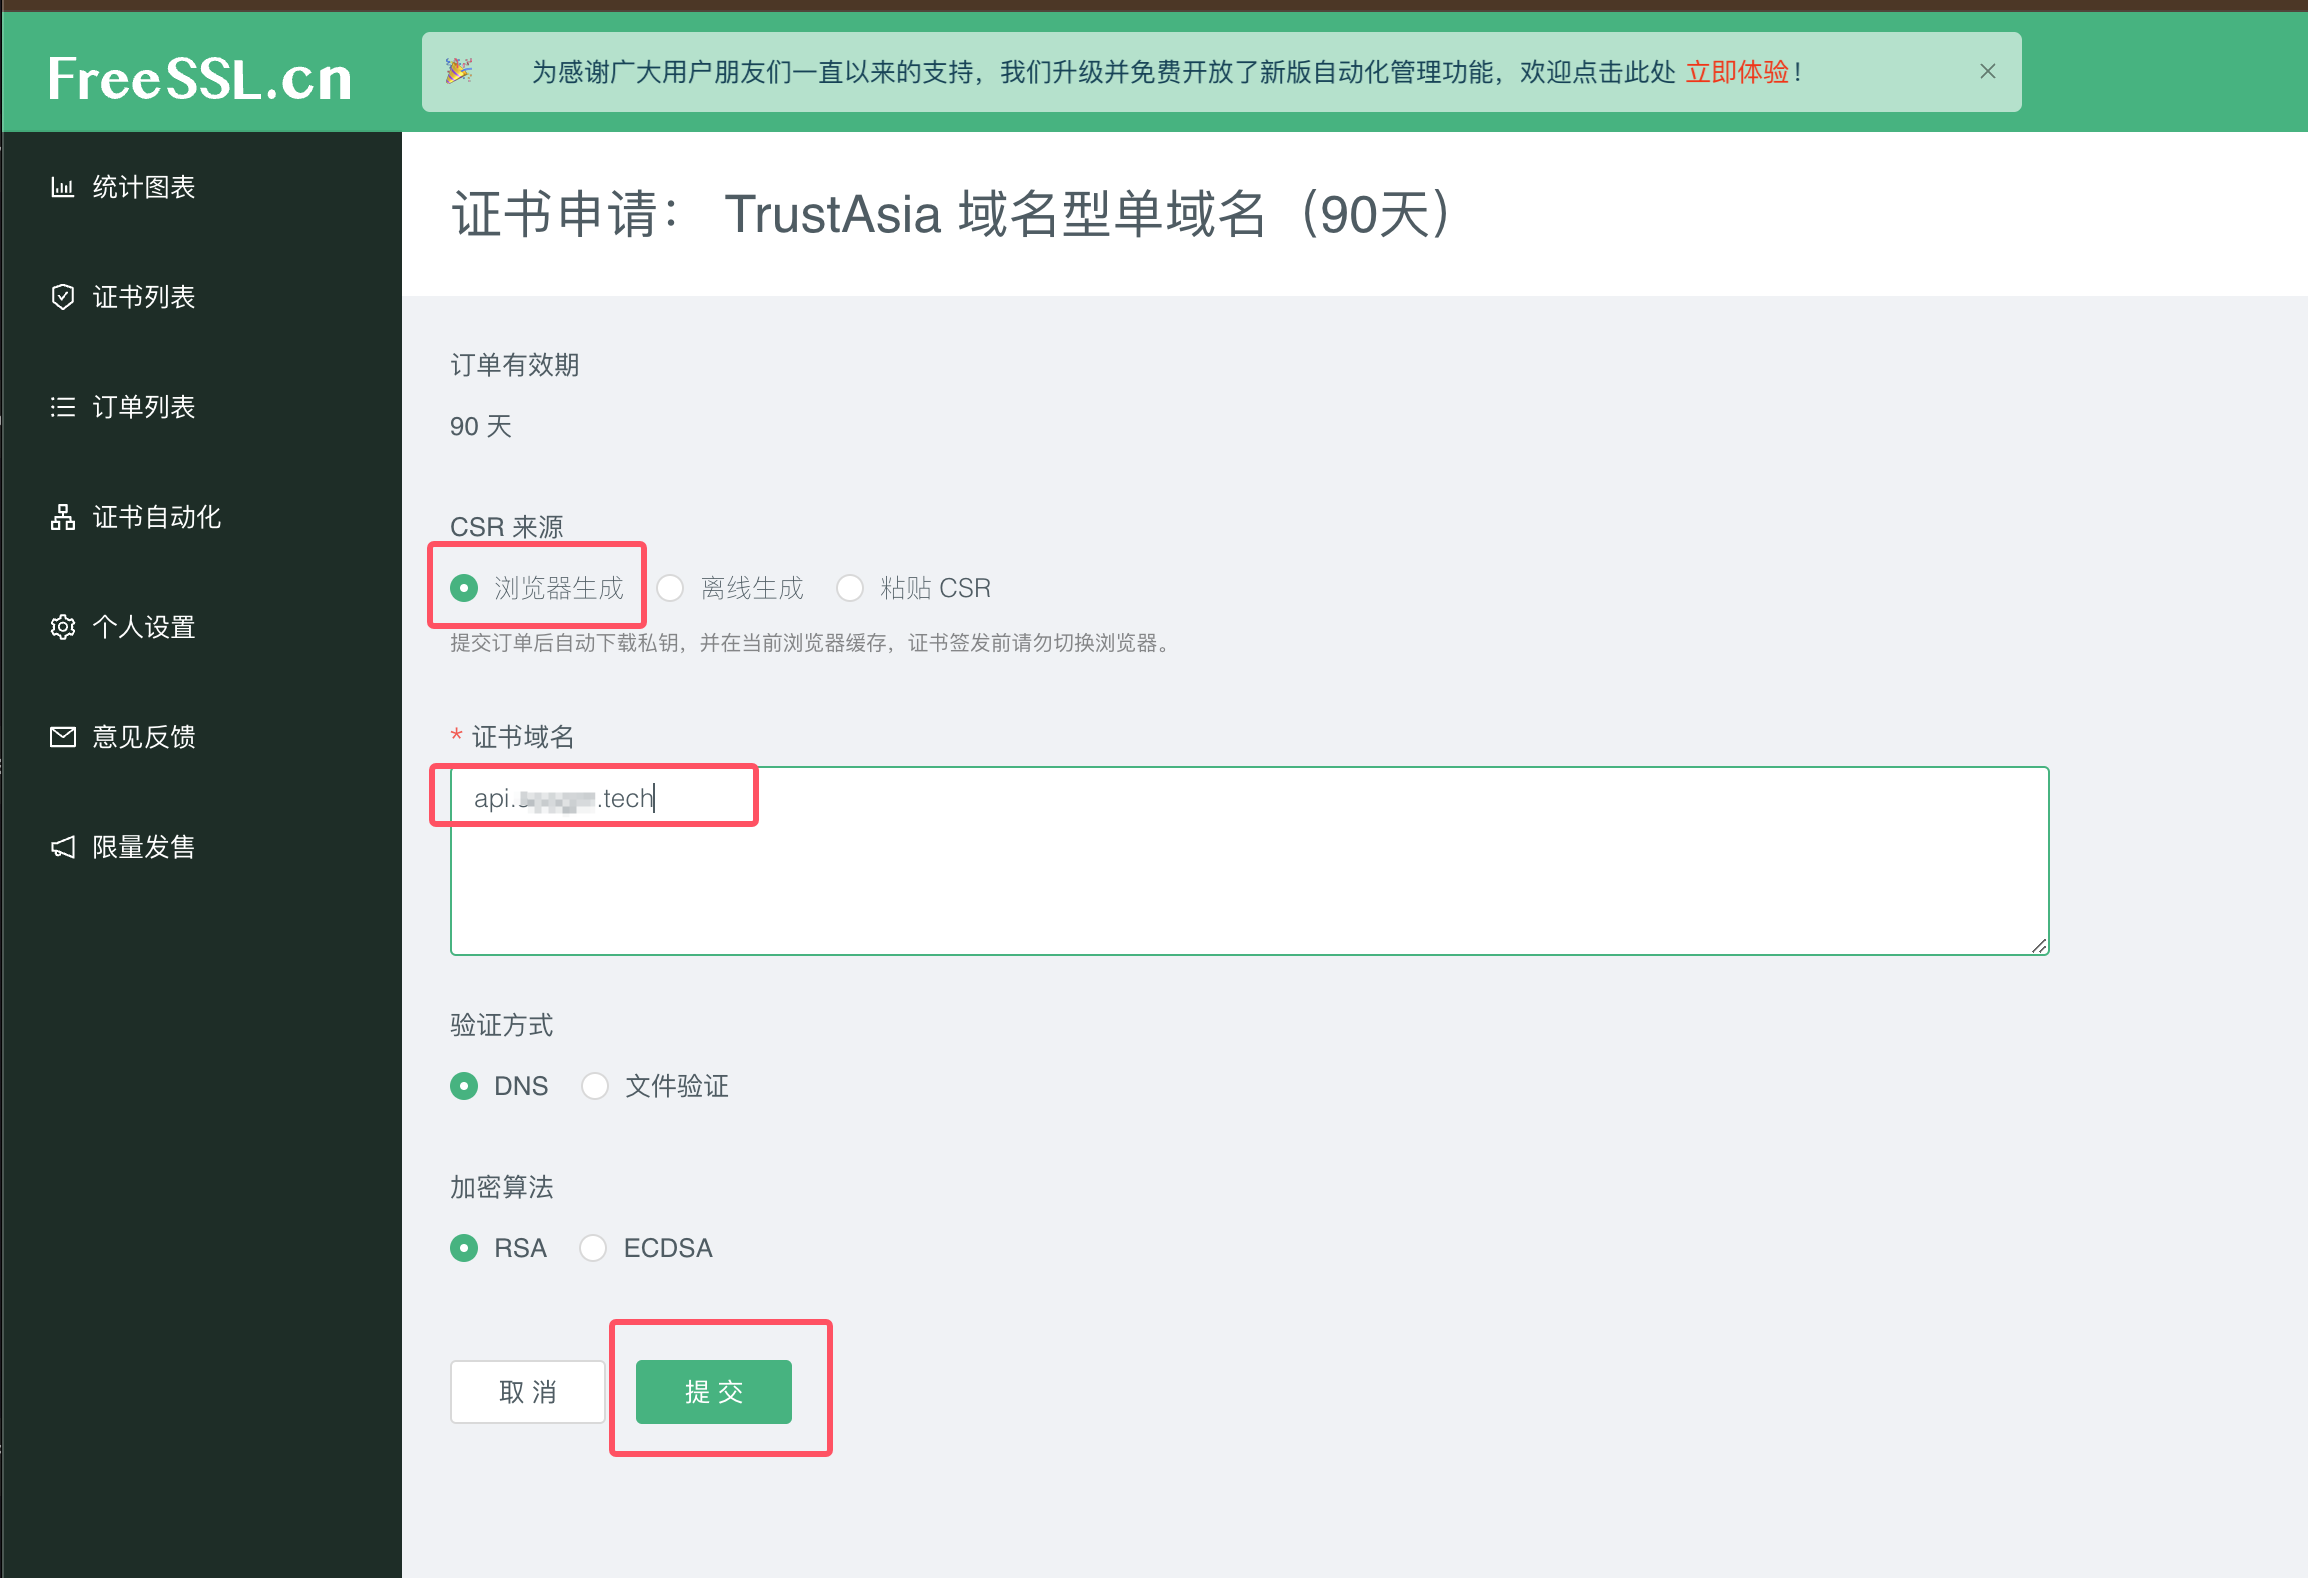
2 通过“浏览器生成”方式快速生成
- 浏览器生成方式流程:
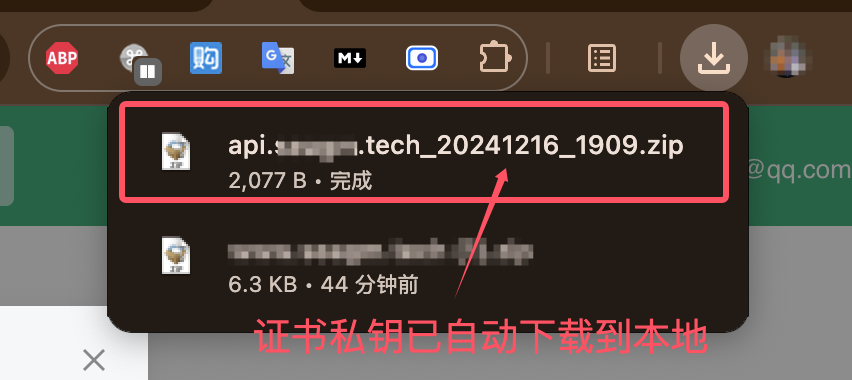
- 获取证书私钥:提交订单后自动下载私钥,并在当前浏览器缓存(证书签发前请勿切换浏览器)
- 获取证书公钥:证书签发完成后,下载公钥
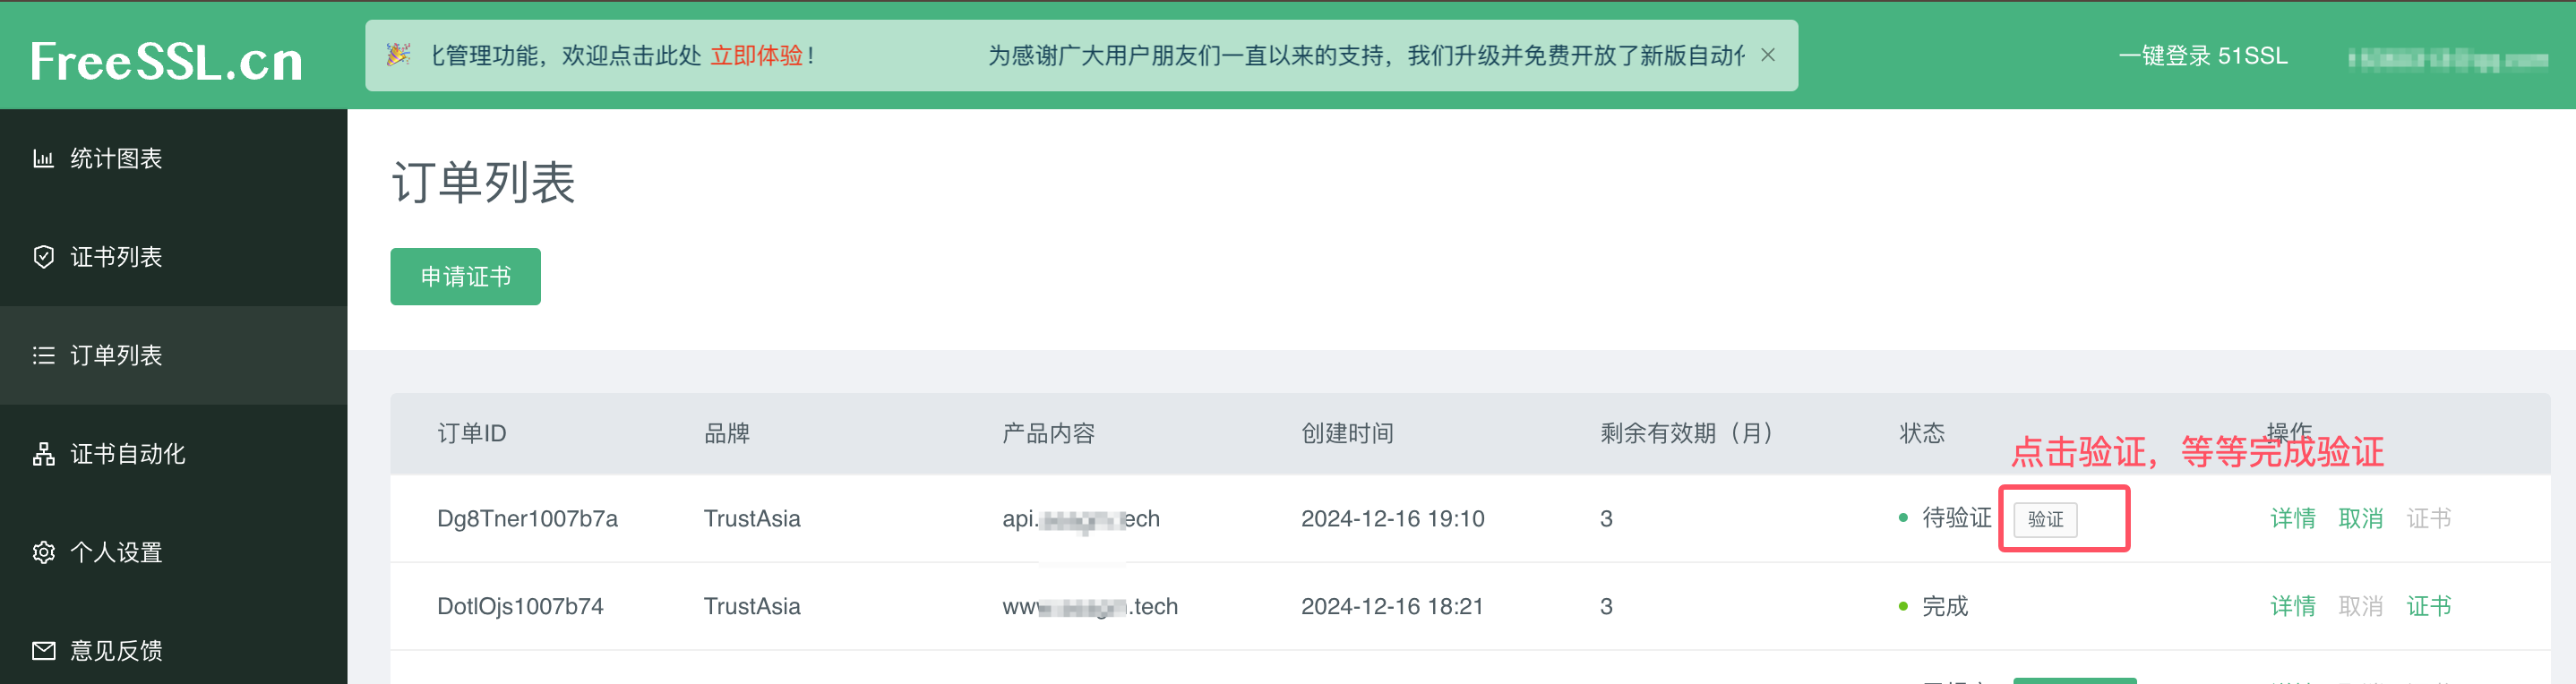
2.1 创建证书申请订单 获取私钥

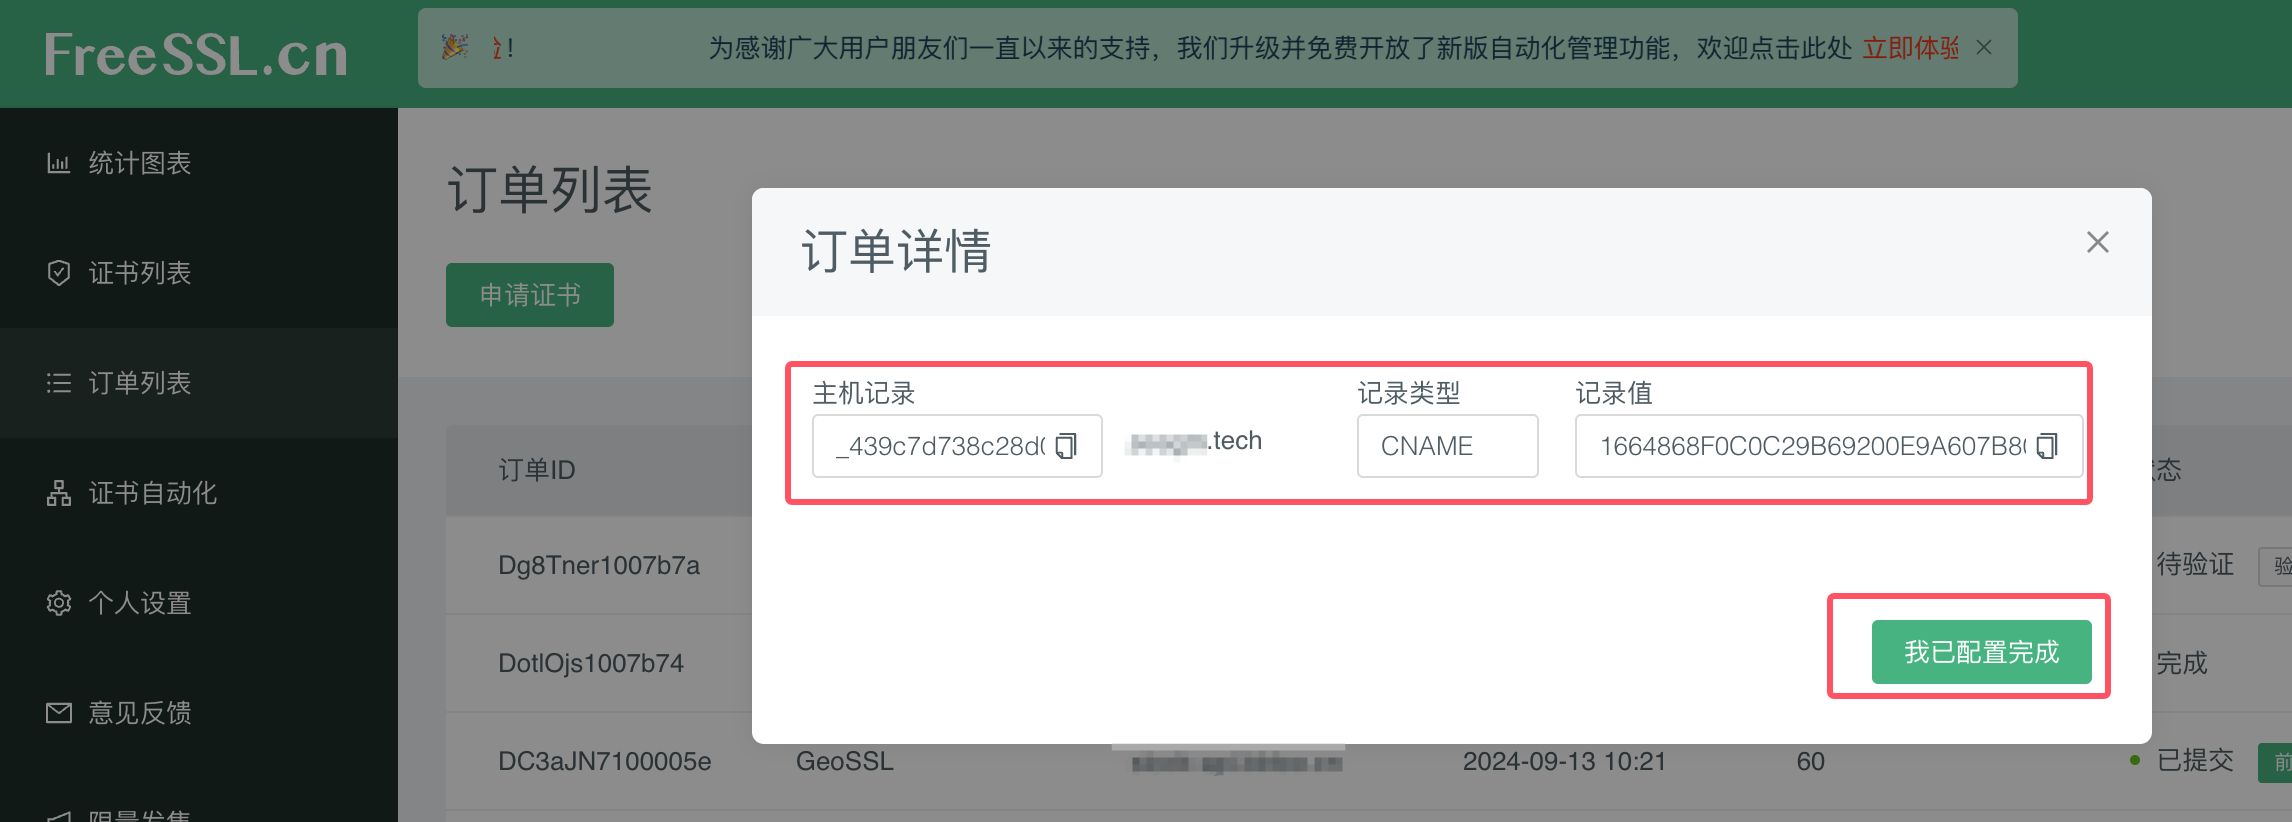
2.2 完成域名验证
2.3 等待签发证书 获取公钥证书
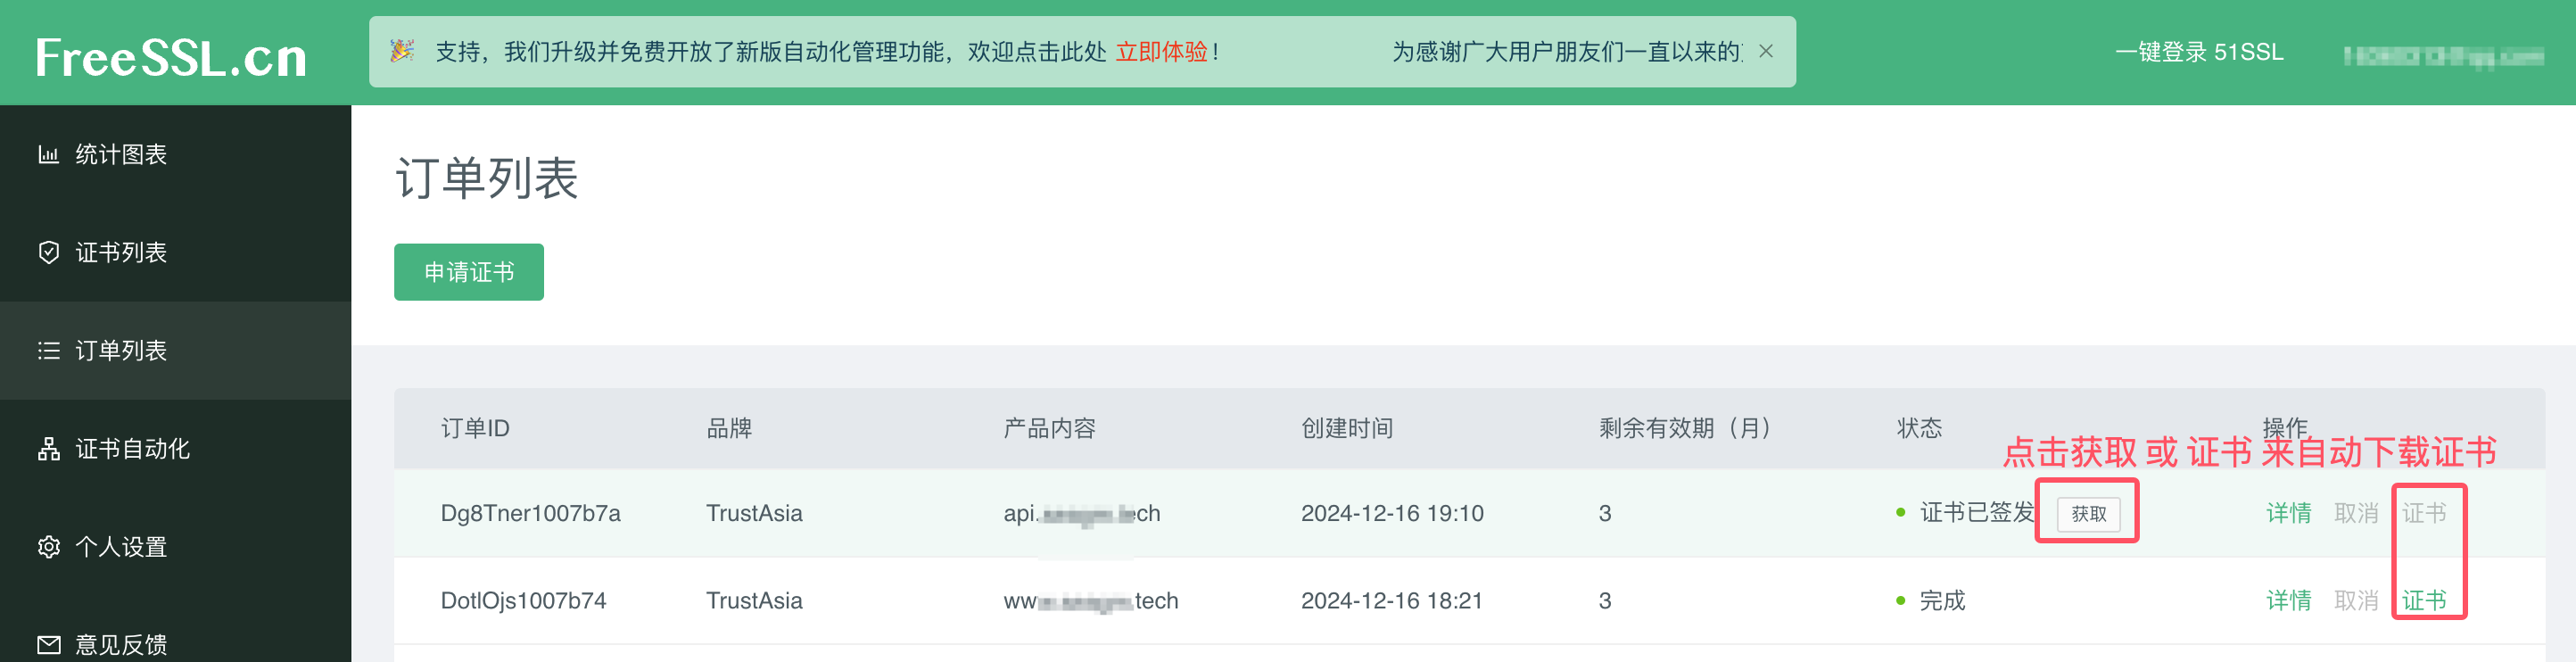
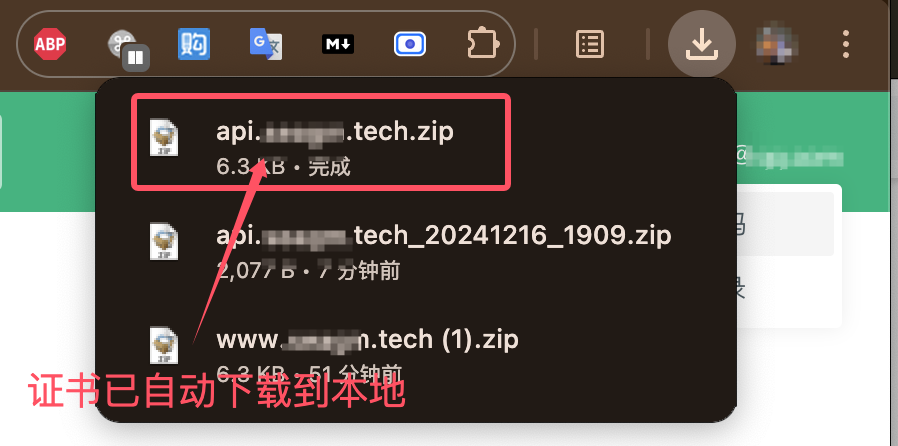
2.4 部署证书
# 在本地对下载的私钥和公钥证书进行解压
# 将服务器上老的证书重命名 (serverHost)
$ mv private.key private.202412.key
$ mv full_chain.pem full_chain.202412.pem
# 通过scp 将证书拷贝到服务器 (local)
$ scp Downloads/private.key s****-t**h:/etc/ssl/s****-t**h/private.key
$ scp Downloads/full_chain.pem s****-t**h:/etc/ssl/s****-t**h/full_chain.pem
# nginx -t 验证 (serverHost)
$ nginx -t
# 重启nginx (serverHost)
$ systemctl restart nginx
通过Certbot手动申请或更新证书
方式一:服务端直接获取和部署
######################## 手动更新证书的命令清单 ########################
$ certbot certonly --manual --preferred-challenges dns -d www.s***m.tech
$ certbot certonly --manual --preferred-challenges dns -d gitea.s***m.tech
$ certbot certonly --manual --preferred-challenges dns -d cp-frps.s***m.tech
$ certbot certonly --manual --preferred-challenges dns -d mkdocs.s***m.tech
######################## 手动更新证书的命令清单 ########################

######################## 服务端直接获取和部署教程 ########################
# 安装 certbot
root@iZ2vce7h83d0b9Z:~# apt update
root@iZ2vce7h83d0b9Z:~# apt show certbot
Package: certbot
Version: 2.9.0-1
Priority: extra
...
root@iZ2vce7h83d0b9Z:~# apt install certbot
Reading package lists... Done
Building dependency tree... Done
....
root@iZ2vce7h83d0b9Z:~# which certbot
/usr/bin/certbot

# 手动获取证书
root@iZ2vce7h83d0b9Z:~# certbot certonly --manual --preferred-challenges dns -d cp-frps.s***m.tech
Saving debug log to /var/log/letsencrypt/letsencrypt.log
Enter email address (used for urgent renewal and security notices)
 (Enter 'c' to cancel): zxxxxxxxxxg19@gmail.com

- - - - - - - - - - - - - - - - - - - - - - - - - - - - - - - - - - - - - - - -
Please read the Terms of Service at
https://letsencrypt.org/documents/LE-SA-v1.4-April-3-2024.pdf. You must agree in
order to register with the ACME server. Do you agree?
- - - - - - - - - - - - - - - - - - - - - - - - - - - - - - - - - - - - - - - -
(Y)es/(N)o: Y

- - - - - - - - - - - - - - - - - - - - - - - - - - - - - - - - - - - - - - - -
Would you be willing, once your first certificate is successfully issued, to
share your email address with the Electronic Frontier Foundation, a founding
partner of the Let's Encrypt project and the non-profit organization that
develops Certbot? We'd like to send you email about our work encrypting the web,
EFF news, campaigns, and ways to support digital freedom.
- - - - - - - - - - - - - - - - - - - - - - - - - - - - - - - - - - - - - - - -
(Y)es/(N)o: Y
Account registered.
Requesting a certificate for cp-frps.s***m.tech

- - - - - - - - - - - - - - - - - - - - - - - - - - - - - - - - - - - - - - - -
Please deploy a DNS TXT record under the name:

_acme-challenge.cp-frps.s***m.tech.

with the following value:

NHbqftCVnKGx6s***************DIN6WVwyzw

Before continuing, verify the TXT record has been deployed. Depending on the DNS
provider, this may take some time, from a few seconds to multiple minutes. You can
check if it has finished deploying with aid of online tools, such as the Google
Admin Toolbox: https://toolbox.googleapps.com/apps/dig/#TXT/_acme-challenge.cp-frps.s***m.tech.
Look for one or more bolded line(s) below the line ';ANSWER'. It should show the
value(s) you've just added.

- - - - - - - - - - - - - - - - - - - - - - - - - - - - - - - - - - - - - - - -
Press Enter to Continue

Successfully received certificate.
Certificate is saved at: /etc/letsencrypt/live/cp-frps.s***m.tech/fullchain.pem
Key is saved at:         /etc/letsencrypt/live/cp-frps.s***m.tech/privkey.pem
This certificate expires on 2025-03-19.
These files will be updated when the certificate renews.

NEXT STEPS:
- This certificate will not be renewed automatically. Autorenewal of --manual certificates requires the use of an authentication hook script (--manual-auth-hook) but one was not provided. To renew this certificate, repeat this same certbot command before the certificate's expiry date.

- - - - - - - - - - - - - - - - - - - - - - - - - - - - - - - - - - - - - - - -
If you like Certbot, please consider supporting our work by:
 * Donating to ISRG / Let's Encrypt:   https://letsencrypt.org/donate
 * Donating to EFF:                    https://eff.org/donate-le
- - - - - - - - - - - - - - - - - - - - - - - - - - - - - - - - - - - - - - - -

#成功后 证书保存在:
# Successfully received certificate.
# Certificate is saved at: /etc/letsencrypt/live/cp-frps.s***m.tech/fullchain.pem
# Key is saved at:         /etc/letsencrypt/live/cp-frps.s***m.tech/privkey.pem

######################## 服务端直接获取和部署教程 ########################
方式二:本地获取证书后上传部署
1 下载安装Certbot
$ apt update
$ apt show certbot
$ apt install certbot
2 通过Certbot手动签发证书
2.1 执行手动创建命令
# 手动创建的命令
$ certbot certonly --manual --preferred-challenges dns -d cp.xxxxx.tech
2.2 根据提示配置dns的txt解析,并验证配置是否生效
2.3 点击继续,让手动创建命令继续执行,完成创建
2.4 部署证书
# 在本地对下载的私钥和公钥证书进行解压
# 将服务器上老的证书重命名 (serverHost)
$ mv private.key private.202412.key
$ mv full_chain.pem full_chain.202412.pem
# 通过scp 将证书拷贝到服务器 (local)
$ scp Downloads/private.key s****-t**h:/etc/ssl/s****-t**h/private.key
$ scp Downloads/full_chain.pem s****-t**h:/etc/ssl/s****-t**h/full_chain.pem
# nginx -t 验证 (serverHost)
$ nginx -t
# 重启nginx (serverHost)
$ systemctl restart nginx
自动申请和部署证书参考
🔐 常见的免费 HTTPS 证书提供者
- Let's Encrypt 🔥(最流行,首选)
- 类型:通配符证书 / 域名验证(DV)证书
- 有效期:90 天(可自动续期)
- 支持的服务器:Nginx、Apache、Tomcat、Node.js 等几乎所有常见的 Web 服务器
- 自动化工具:
certbot(推荐)
- ZeroSSL 🆓(免费和付费版本)
- 类型:通配符证书 / 域名验证(DV)证书
- 有效期:90 天
- 自动化工具:
certbot(ZeroSSL 支持 ACME 协议) - 特点:提供简单的 Web 界面,方便手动管理
- Buypass Go SSL 🔐
- 类型:域名验证(DV)证书
- 有效期:180 天
- 自动化工具:支持 ACME 协议,可与
certbot搭配使用
- Cloudflare 🌐
- 类型:免费 SSL(使用 Cloudflare 反向代理)
- 特点:无需在服务器上安装证书,Cloudflare 提供“边缘 SSL”
🛠️ 在服务器上自动申请和部署 HTTPS 证书的脚本方案
这里的示例使用 Let's Encrypt 和 Certbot,它是最常用的自动化工具。
环境要求:
- Linux 服务器(Ubuntu、Debian、CentOS 等)
- root 权限
- 域名和 DNS 记录(将您的域名指向服务器 IP)
🔧 步骤 1: 安装 Certbot
Ubuntu / Debian
sudo apt update
sudo apt install -y certbot python3-certbot-nginx
CentOS / RHEL
sudo yum install epel-release -y
sudo yum install certbot python3-certbot-nginx -y
🔧 步骤 2: 申请 HTTPS 证书
Nginx 服务器
sudo certbot --nginx -d example.com -d www.example.com
Certbot 会使用 Let's Encrypt 的“HTTP-01”挑战方式来验证您是否拥有对
cp.s***m.tech的控制权。 Certbot 会在 /var/www/html/.well-known/acme-challenge/ 中创建一个临时文件,Let's Encrypt 会通过http://cp.s***m.tech/.well-known/acme-challenge/访问这个文件来确认您的控制权。所以需要在域名解析的ip所在的服务器上执行
解释:
--nginx: 自动检测 Nginx 并修改配置-d: 要申请的域名
Certbot 会在 Nginx 配置中自动添加以下部分:
server {
    listen 443 ssl;
    server_name example.com www.example.com;

    ssl_certificate /etc/letsencrypt/live/example.com/fullchain.pem;
    ssl_certificate_key /etc/letsencrypt/live/example.com/privkey.pem;
}
🔧 步骤 3: 自动续期证书
Let's Encrypt 证书的有效期为 90 天,建议在到期前 30 天内自动续期。
1. 检查 Certbot 是否续期成功
sudo certbot renew --dry-run
2. 将续期脚本加入 cron 定时任务
echo "0 0,12 * * * root certbot renew --quiet" | sudo tee /etc/cron.d/certbot-renew
解释:
- 每天 00:00 和 12:00 执行
certbot renew,自动续期到期的证书。 --quiet禁止日志输出,只有错误信息会显示。
📜 完整 Shell 脚本示例
#!/bin/bash

# 1. 更新系统包
sudo apt update && sudo apt upgrade -y

# 2. 安装 Certbot 和 Nginx 插件
sudo apt install -y certbot python3-certbot-nginx

# 3. 检查 Nginx 状态,重启(确保 Nginx 正在运行)
sudo systemctl enable nginx
sudo systemctl restart nginx

# 4. 申请证书(修改 example.com 为您的域名)
DOMAIN="example.com"
EMAIL="admin@example.com"

# 5. 申请证书(自动同意条款并不提示交互)
sudo certbot --nginx -d $DOMAIN -d www.$DOMAIN --non-interactive --agree-tos --email $EMAIL

# 6. 检查证书续期(测试续期)
sudo certbot renew --dry-run

# 7. 确保续期脚本在 cron 中
CRON_JOB="0 0,12 * * * root certbot renew --quiet"
CRON_FILE="/etc/cron.d/certbot-renew"

# 8. 将续期脚本写入 /etc/cron.d/certbot-renew
echo "$CRON_JOB" | sudo tee $CRON_FILE

# 9. 重启 cron 服务
sudo systemctl restart cron

echo "✅ HTTPS 证书申请和自动续期脚本已完成!"
使用说明:
- 将
DOMAIN="example.com"替换为您的域名。 - 将
EMAIL="admin@example.com"替换为您的电子邮件。
🔥 常见问题和解决方法
| 错误问题 | 可能的原因 | 解决方案 |
|---|---|---|
| Rate Limit 错误 | 你请求证书太频繁 | 等待 1 小时或更改域名 |
Challenge failed | DNS 解析未生效 | 确认 DNS 记录指向服务器 IP |
Port 80/443 被占用 | 其他程序占用 80/443 端口 | 检查 Nginx/Apache 是否正常运行 |
certbot renew 失败 | cron 定时任务未生效 | 确认 /var/log/letsencrypt 中的日志 |